Colour to B&W with Silver Efex Pro 2
You’ve been shooting all day, your memory cards are full of photographic goodness and now its time to import them and take a look at the fruits of your labor. You quickly flag the keepers and discard the others. Sounds familiar so far, right ? But perhaps there is further potential in that pile of photographs that you’ve overlooked and just dumped into the virtual trash can at the swish of a mouse pointer.
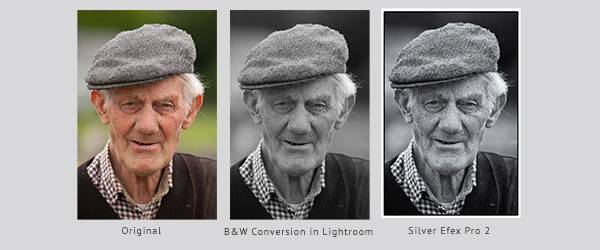
How often have you scanned over a photograph and discarded it as not being that interesting or rejected because a strong colour is screaming at you for attention competing with the main subject in the photograph. It’s surprising how often an image you might otherwise discard can look much more compelling and tell a stronger story when converted to black and white.
I recommend you get in the habit of reviewing those colour images that don’t make the cut during your initial post processing steps. Do a quick black and white conversion in whatever tool you use (Lightroom is my preference) and perform a quick review for potential keepers. You might be pleasantly surprised.
Of course a simple black and white conversion (performed by simply desaturating the image fully) is rarely the finished product and generally looks flat. The reason for this is that each pixel represents three colours which are converted into a monochrome shade and as a result the brightness of the pixel changes.
There are many tools and techniques for converting photographs into black and white within Lightroom and Photoshop. The B/W colour mix panel in the Lightroom Develop module combined with Clarity, Contrast, Black and Tone Curves can all be used to generate very good results for your specific image. There are also standard Lightroom presets that will convert the image into black and white with different adjustments and duo tone options (e.g Sepia). All of these controls provide significant capability to fine tune the “look” of your black and white image. However, there are times you might want to achieve more localised results within certain parts of the photograph and for this I find the Sliver Efex Pro 2 plugin for Lightroom or Photoshop invaluable.
Silver Efex Pro 2 was developed by Nik Software and subsequently acquired by Google. It is part of a larger suite of plugins which could be purchased individually, however, I notice at the time of writing this article the only option available now is to purchase the entire suite for $149 from Google, which is a shame, particularly if you have no requirement for the other plugins (which are equally very effective I must confess).
I don’t intend to walk you through the entire step by step process within Silver Efex Pro 2 to achieve the result for the photograph on the right above, however, strongly suggest you watch this suite of youtube video tutorials from Nik Software. They are concise and provide an excellent overview of the plugin’s controls and capabilities.
The flexibility offered in terms of localised changes is truly excellent and allows for greater creativity to achieve the desired result.
As you can tell I am a big fan of the plugin and hope that Google continue investing in the product into the future.
The photograph featured was of an obliging elderly gentlemen at a horse fair in Athleague, Co. Roscommon during summer 2013.